Whether you’re moving to a newer version of SharePoint, or getting ready to move to SharePoint Online, these tips to creating a SharePoint migration plan will help you get started.
So, you’ve decided to go ahead with a SharePoint migration—or someone higher up decided and you’ve inherited the migration project.
Whatever kind of SharePoint migration you’re planning, if you’re here, it’s because you’re ready to get started. But where should you start? What should you do first? How should you do it?
A smooth SharePoint migration is closer than you think.
Download our SharePoint migration guide now
Here at ShareGate, we’ve spent a lot of time thinking about the steps involved in a successful migration—especially as we continually strive to improve on our SharePoint migration tool. We’ve learned that creating a detailed plan for your migration will help you answer these questions and more.
Table of contents
Create a SharePoint migration plan template
What is a migration plan template? I could pull out a definition from a sophisticated source or we could try to define it together.
Basically, a template is exactly what it sounds like: we’re identifying the milestones we want to achieve before arriving at our destination.
But before we begin the template, we obviously need to know what our destination is.
Define a successful migration
Before we create any sort of plan for our migration, we should know what to expect after the project is over.
The first thing you need to do is define your organization’s criteria for a successful SharePoint migration. When do you expect the migration to be complete? What content should absolutely be moved? Should it be branded? Etc.
Use the RMR strategy (Yes, I just invented that)
Before we can create our template, we need to know what we’re going to migrate.
At ShareGate, over the course of our many migrations, we created a strategy we like to call RMR.
Remove, Migrate and Rebuild.
Remove
These are the sites you do not plan on moving. Note the word “remove”. This means we are explicitly deleting these sites, or leaving them on the old SharePoint if they’re isolated in their own database.
The idea is that these sites will not be moved to the new SharePoint destination.
Migrate
These are the sites that will be migrated to SharePoint. How? That’s up to you! Choose the type of migration you think is the best fit for your organization.
Both SharePoint 2013 and 2016 offer deferred Site Collection upgrades, where the Site Collection administrator can upgrade it himself after an upgrade preview.
At a granular level, you could upgrade the Site Collection to 2013 or 2016, then use a combination of export/import to move individual sites. Though this could prove challenging depending on your SharePoint.
Finally, you could use ShareGate to migrate elements of your structure. Again, how you choose to migrate is up to you.
Rebuild
Another option is to completely rebuild the site at the destination. This usually happens to heavily customized sites in SharePoint 2010.
With new web parts and apps available in SharePoint, there are probably a few sites that either won’t work, or just need to be rebuilt in order to take advantage of new architecture and solutions.
Learn SharePoint Online: Best practices, tips, and tricks
Building your SharePoint migration plan
Now that you know what the RMR strategy is—and you’ve developed your own migration template with it—you are ready to create your SharePoint migration plan.
You could create a beautiful visual plan using XMind, Miro, Visio, or other similar tools. But the method I use is a little more hands-on… I use SharePoint!
Wait, what? No, I don’t draw anything. Instead, I create a SharePoint list to help me identify the sites affected by the migration.
My objective here is to list all the sites that will be affected and identify whether each one will be Removed, Migrated or Rebuilt. I also need to know that the action is approved and when it will be done.
Thankfully, with the assistance of ShareGate, implementing a well-designed cloud migration plan can become a seamless and straightforward process.
1. Create the SharePoint list.

I created a list called Migration Roadmap with the columns above. Within it, I will enter all my sites from whichever environment I am migrating from.
If you don’t have an inventory already available, you can easily export it using PowerShell.
You can also use ShareGate’s migration assessment tool for SharePoint to ensure your migration plan is executed as planned.
I use the following command:
Get-SPWebApplication http://intranet.contoso.com | Get-SPSite -Limit All | Get-SPWeb -Limit All | Select Title, URL, ID, ParentWebID | Export-CSV C:siteinventory.csv –NoTypeInformation
Technically you could even take this CSV file and import it into the Visio wizard and it will draw a diagram for you.
The migration action column has three choices: Remove, Migrate and Rebuild. I also enabled Content Approval on the list, so that the business could approve whenever we put the migration action to Remove.
2. Add the content in the SharePoint list to create your migration plan

Of course, the list would be a lot longer in a non-fictional organization.
This is now your SharePoint migration plan. You can export or create a custom view to show this list however you wish, whether for a manager or other users. All the information needed is listed here.
Now you either Remove, Migrate or Rebuild your sites in SharePoint.
But it’s not always going to be Remove, Migrate or Rebuild.
There are many new features and web parts that can alter your architecture. Some will fit this in the Rebuild migration action, and that’s fine. The important thing is to adapt the strategy to your needs.
With the new search and content search web part you are bound to do things differently. What I am trying to say is, to take the time needed to carefully analyze the existing architecture before moving everything as is.
If you want to understand what a SharePoint migration plan in practice looks like, see how this organization tackled a large SharePoint migration from on-premise to online with ShareGate.
Understand your inventory
The most important pre-migration step is taking inventory of your current environment. This will help you make better decisions about what to migrate and how long it will take to upgrade your end users into their new environment.
You need to know what’s under the hood, and ShareGate can help.
Using ShareGate, you can run a source analysis to determine things like:
- the size of your environment
- the size of your file shares
- the number of site collections
- the number of sites
- the number of unused or abandoned sites
- the number of files and folders
- the number of workflows
- Potential issues
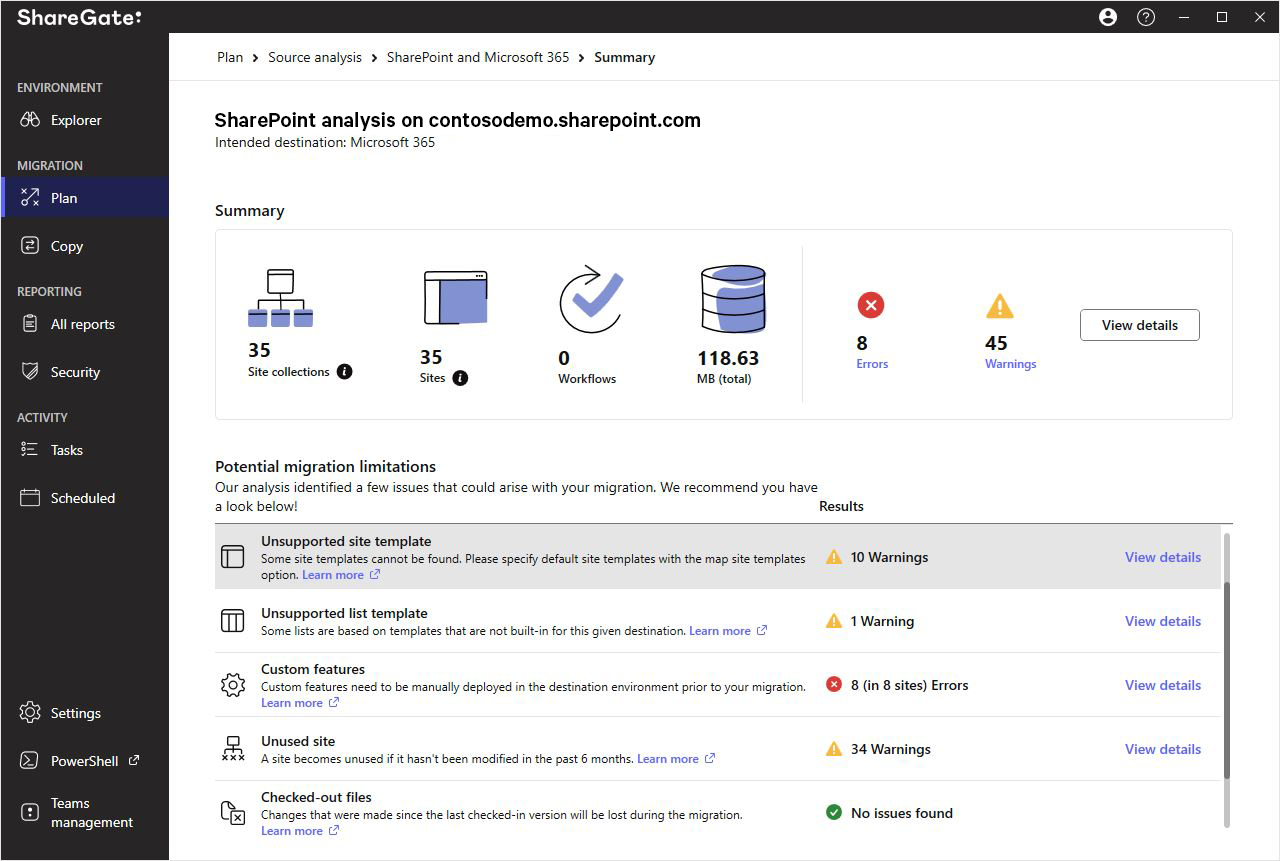
After scanning your environment, ShareGate will give you a quick summary of what you have, as well as list potential warnings and errors you might encounter for the desired destination.
This feature is perfect if you’re trying to get an idea of how complicated or large your migration will be. It’s a great way to estimate the overall effort required, and it’s available without limitations in ShareGate’s trial version.
Prioritize how to tackle your SharePoint migration plan
There are certain details you must prepare before you execute your migration plan.
- Who oversees the Remove portion of the roadmap?
- Who oversees the Migrate portion?
- Who oversees the Rebuild portion?
- What is the workflow to approve each of those actions? And who will be approving them?
- Who will be meeting the site owners, and will it be the same person in charge of the action?
I created a “points” system to assign a business priority to the sites to be moved. A combination of the level of interest that a team has towards SharePoint (did they follow the training, have they shown interest in working with SharePoint) and the number of people affected. This helped me prioritize the migration.
I am sure you will think of other things to plan for based on your organization and migration project because there are never two the same.
What I will never stress enough, is that you need a plan and a roadmap—otherwise you’ll be stuck in the never-ending migration cycle where, at some point, someone will get mad and say, “That’s it.”
Now that you know how to create a plan, here’s how to avoid common pitfalls during your SharePoint 2013 to SharePoint Online migration.